Tutorial: Making Custom Furniture With CP
Making Custom Furniture with CP
This tutorial explains how to add custom furniture using the new 1.6 game update features and Content Patcher. The tutorial assumes you already have the game unpacked and that you have some basic familiarity with the Content Patcher format. The mods referenced as examples in this tutorial are Bonsai Trees (formerly Bonsai Trees for DGA) and Magic Furniture.
Furniture Data Format
The furniture data format is documented on the wiki page for items, but to break it down for you, you're going to need the following:
- Furniture ID: make this be
{{ModId}}_FURNITURENAMEso that you don't accidentally use the same ID as someone else, and so that Lookup Anything can automatically tell which mod it's from. - Furniture name: use the ID. Player will not see this in the game.
- Furniture type: if you're making a pretty normal piece of furniture, just look through the vanilla furniture and pick one that's very similar to your piece of furniture and use that type. If you're not sure which one to pick, I'll explain in more detail further down.
- Tilesheet size: this is the "default" size of the furniture in tiles. For example, if your first/front-facing/default sprite is 2 tiles wide and 3 tiles tall, it would be
2 3. - Bounding box size: this is the size of the area on the floor that your furniture takes up, which the farmer won't be able to walk through. For example, if you want this to be the bottom 1 tile on a furniture that is 2 tiles wide, you would specify
2 1. Since this box starts at the bottom left corner of your furniture, typically you would want this to have the same width as your furniture. For furniture like rugs or paintings that the player never walks into, just set this to be the same as the tilesheet size. - Rotations: you can have 1, 2, or 4 rotations. See below for more on rotations.
- Price: this determines how much the furniture costs when it comes up for sale randomly at Robin's.
- Placement restriction: this determines whether the furniture can be placed indoors, outdoors, or everywhere.
- Display name: this is the name that the player sees in the game. This can be a tokenizable string (which is useful for translation or allowing other nifty things, see the linked docs for more details). You can set this to be
[LocalizedText Strings\\Furniture:{{ModId}}_FURNITURENAME.Name]and then set up theStrings/Furnitureentry to use i18n for ease of translations. - Spritesheet index: this determines where in the spritesheet the game looks for your furniture's sprites. See below for more details.
- Texture: this determines which spritesheet the game uses for your furniture. If left out, it's the vanilla furniture spritesheet, so don't leave this out for custom furniture! The path you put here is going to be the same place you load your furniture spritesheet to with CP, and it's going to be the place in the
Contentfolder (theTargetin CP), not the local filepath (theFromFilein CP)! You will need to turn the slashes into backslashes, and then properly escape the backslashes here. For example, if you were going to put the spritesheet inMods/{{ModId}}/bonsai, you would putMods\\{{ModId}}\\bonsaihere. - Sell randomly/show in furniture catalogue: Set this to
trueor leave this out if you're making a nice, normal piece of furniture. Set this tofalseif your furniture is special or rare or you're setting up your own way for the player to get the furniture. - Context tags: If your furniture has any reason to need context tags, you can set them here. I don't know of a reason to set these, but it might be used in the future by mod frameworks. If you don't need them, you can leave this blank.
Once you have what you want to fill in for each of these pieces of information, you'll need to glue all of them except the ID together, and add it to the game using the ID. The game expects them to be separated by a single / character between each piece of information and no extra spaces anywhere. If the information is optional and you don't have any other mandatory information afterwards, you can stop putting slashes. If you want to skip an optional information but put in a later piece of optional information, you should just put a slash and move on to the next piece of information.
Example Furniture 1: Bonsai Tree
For example, if you were making a bonsai tree furniture with the following characteristics:
- Furniture ID:
{{ModId}}_Bonsai1 - Furniture name:
{{ModId}}_Bonsai1 - Furniture type:
decor(pretty basic decoration type) - Tilesheet size:
1 2(1 tile wide, 2 tiles tall) - Bounding box size:
1 1(1 by 1 tile collision box, in the lower half of the furniture) - Rotations:
1(just 1 rotation) - Price:
1000 - Placement restriction:
-1(default for decor type, which is placeable everywhere) - Display name:
[LocalizedText Strings\\Furniture:{{ModId}}_Bonsai1.Name](see below in the CP section for why it's set to this, but it's for translations) - Spritesheet index:
0(see the spritesheet setup section for why this is 0, but it's because it's the furniture in the top left corner of the spritesheet) - Texture:
Mods\\{{ModId}}\\bonsai_trees - Sell randomly/show in furniture catalogue: left blank, so it defaults to true
- Context tags: left blank
It would have data that looks like this:
"{{ModId}}_Bonsai1": "{{ModId}}_Bonsai1/decor/1 2/1 1/1/1000/-1/[LocalizedText Strings\\Furniture:{{ModId}}_Bonsai1.Name]/0/Mods\\{{ModId}}\\bonsai_trees"
Which is what you would put into the patch to add your furniture into the game (see below in the CP section).
Example Furniture 2: Magic Rug
Furniture Types
There are many different types of furniture in the game, some of which have very specific limitations or implications for how they work. The words that look like this are the exact names of the types.
Sittable furniture types
chairbenchcoucharmchair
These are functionally pretty much the same, but they have slightly different rules for where the seats are located. Picking the one that's closest to your furniture is likely to have the best results.
Table furniture types
long tabletable
These should be pretty much the same.
Wall or floor furniture types
paintingrugwindow
These aren't going to have collision with the farmer. Rugs should be set to be only placeable indoors, unless you want to cause problems. Paintings and windows are only placeable on the walls in decorateable locations like the farmhouse and sheds.
Special furniture types
dresserbedfishtank
These are custom subclasses of furniture (think "super special custom behaviors"). Dressers can hold clothing in them, and probably shouldn't have any other special behavior added with SpaceCore tile properties. Beds can be walked through in the middle, and trigger the sleep question when the player does. Beds have the special format of bed for single beds, bed double for double beds, and bed child for child beds. The fishtanks have their capacity automatically set based on the footprint, with the number of swimming fish allowed being the width minus one, the number of ground fish being the same, and the number of decorations being 1 for tanks 2 tiles wide or less and unlimited but only one of each type for tanks 3 tiles wide and up.
Light-emitting furniture types
lampfireplacetorchsconce
Fireplaces and torches get a fire animation pasted over them in a specific location (so it's best to keep them to similar sizes/shapes as vanilla examples), and they don't change sprites. They are toggled by the player manually, as opposed to lamps and sconces which turn on automatically when it's dark out. Sconces are only placeable on walls.
Miscellaneous furniture types
decorotherbookcase
These don't generally have any particular implications, but decor is a good default if you are just making general decorations. I'm not actually sure why bookcases have their own type. In the vanilla furniture, "other" is only used for the China Cabinet.
Non-type based special furniture
There are stools, which can be sat on from any direction. If you are making a stool, you must make sure the furniture name/ID contains Stool in it somewhere. The vanilla game sets the furniture type to be chair for stools.
There are TVs, which are not possible to make with CP due to the fact that they're hardcoded to specific IDs. On top of that, the TV channel pictures have hardcoded coordinates and sizes. The vanilla game sets the TV types to decor and then hardcodes them to be TVs in C#.
Default Furniture Tilesheet Sizes and Bounding Boxes
If you put -1 instead of 1 1 in either the tilesheet size or the bounding box size, the game will use the defaults for each furniture type.
Defaults for tilesheet size:
chair: width = 1, height = 2bench: width = 2, height = 2couch: width = 3, height = 2armchair: width = 2, height = 2dresser: width = 2, height = 2longTable: width = 5, height = 3painting: width = 2, height = 2lamp: width = 1, height = 3decor: width = 1, height = 2other: width = 1, height = 2 (also the fallback option)bookcase: width = 2, height = 3table: width = 2, height = 3rug: width = 3, height = 2window: width = 1, height = 2;fireplace: width = 2, height = 5;bed: width = 1, height = 2 (due to hitting the fallback option)torch: width = 1, height = 2sconce: width = 1, height = 2
Setting Up the Spritesheet
When you start setting up the spritesheet, you can either making one big spritesheet with all the furniture together, or you can make individual spritesheets for each type of furniture. Depending on how much furniture you're making, it might be more tedious to make sure the furniture isn't overlapping, or it might be more tedious to manage working in many small images. It's entirely up to you which to choose.
Sprite Indices
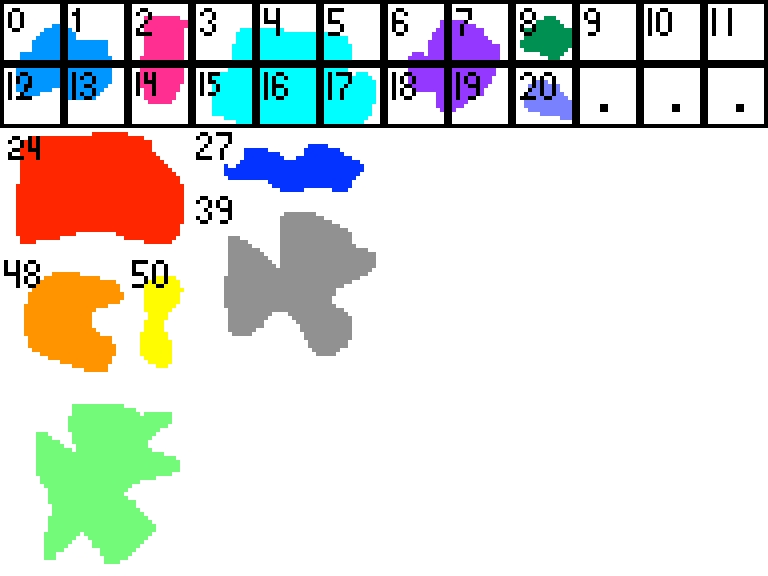
For every piece of furniture, there is a specific index that tells the game where the sprites for the furniture begin in the spritesheet. The game starts by looking for the "default" sprite in the size indicated by the data, located at that index, and then moves to the right if there are more sprites (because of rotations, light on/off, or other reasons). This index starts at 0 in the top left corner of the spritesheet, and then counts up from left to right and then down the spritesheet.
Here's a picture with the indices labeled:
In this case, the light blue furniture in the top left would use index 0, the hot pink furniture to the right of that would use index 2, and so and so forth. The furniture below the first two rows has been labeled with the starting index.
Rotations
The game format limits you to having 1, 2, or 4 rotations. Rugs and non-end table tables are limited to 2 rotations.
The sprites for rotations must be placed into directly to the right of the first sprite, lined up at the top. If it's a 2-rotation furniture, there's one extra sprite, typically assumed by the game to be back-facing. If it's a 4-rotation furniture, there's two extra sprites, typically assumed by the game to be left/right-facing and back-facing in that order.
Note that you cannot have rotations if your furniture falls into one of the other categories below that has an extra sprite next to it, since there can only be 1 sprite directly to the right of the original sprite.
How Rotation Works Internally
Rotation values are internally coded as being 0, 1, 2, or 3. Rotation value 0 means that the furniture is facing forwards, rotation value 1 means the furniture is facing right, rotation value 2 means the furniture is facing backwards, and rotation value 3 means the furniture is facing left. For furniture that only has 2 rotations, the allowed rotation values are 0 and 2 (forwards and backwards).
Furniture has a relatively complex system of logic for determining the rotated collision area and rotated spritesheet area dimensions.
Collision Area Calculation
The collision area calculation is pretty straightforward, as it just flips the X and Y values for the collision area in the right and left rotations.
Spritesheet Area Calculation
The spritesheet area calculation is broken down into two cases: if the collision area is square, or if it's non-square.
Square collision area furniture is straightforward: it just tiles the same size sprite side by side. See the chair below for an example of what this looks like.
Non-square collision area furniture is more complicated.
- The front-facing rotation uses the default (data-defined) sprite area.
- The side-facing rotation is located directly to the right of the default sprite, lined up at the top. It has a width of
default height - 1, and a height ofdefault width + 1. For left-facing rotations, the sprite is flipped. - The back-facing rotation has the same width and height as the default sprite, and is located directly to the right of what the side-facing sprite would be (whether or not the furniture has 4 rotations).
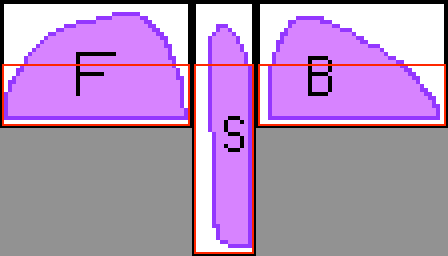
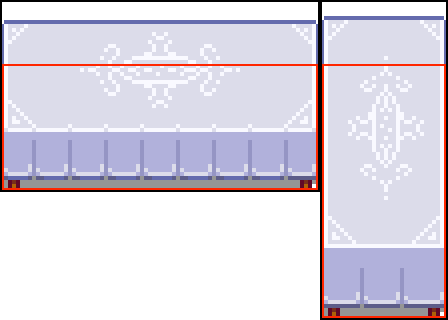
Here's an example of what this looks like for a furniture that is 3 tiles wide and 2 tiles tall (frames shown in black), with a collision area (shown in red) that is 3 tiles wide and 1 tile tall:
Collision and Spritesheet Area Exceptions
However, specific furniture types break this rule by adding special behaviors.
- Couches and armchairs have a side rotation collision area that is one tile smaller in the width, and one tile taller in the height. Also, the -1 and + 1 offsets are not applied when swapping width and height for the spritesheet area, so it simply swaps the width and height.
- Long tables have a one tile adjustment to the height for both collision areas and sprite areas, so for the collision area the rotated height is reduced by 1, and for the spritesheet area, the rotated height is just the width.
- If it's a table or a long table but not if the name contains
"End Table"or"EndTable", then the back-facing rotation sprite is assumed to have the same behavior as the right-facing rotation sprite. - If it's a rug, then the back-facing rotation sprite (rotation 2) is assumed to have the same behavior as the right-facing rotation sprite (rotation 1). Also, the -1 and + 1 offsets are not applied when swapping width and height for spritesheet area rotations, so the rug simply swaps the width and height.
Rotation Examples
Here's an example with a furniture of type chair (no special exceptions) that is 1 tile wide and 2 tiles tall (shown in black), with a 1 tile wide and 1 tile tall collision rectangle (shown in red):
Here's an example with a furniture of type dresser (no special exceptions) that is 2 tiles wide and 2 tiles tall (shown in black), with a 2 tile wide and 1 tile tall collision rectangle (shown in red):
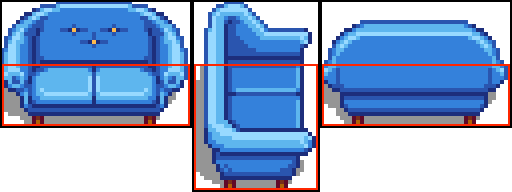
Here's an example of a furniture of type couch (one extra tile smaller in the width, and one extra tile taller in the height for the rotated collision area, plus no change to spritesheet size when rotated) that is 3 tiles wide and 2 tiles tall (shown in black), with a 3 tile wide and 1 tile tall collision rectangle (shown in red):
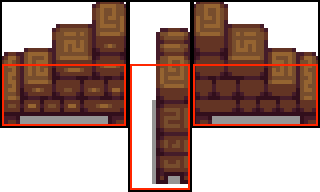
Here's an example of a furniture of type longTable (one extra tile shorter in the height for the rotated collision area, plus rotated spritesheet area height is just the default spritesheet area width, plus the rotation with value 2 is treated as a side rotation)
Light-Emitting Furniture
For lamps, windows, and other furniture that has a night/day switch in texture, you cannot have rotations. However, you must have a second sprite to the right of the default sprite, which for lamps is the "on" sprite and for windows is the "nighttime" dark sprite. The game knows to look for these based on the furniture type.
Beds and Fishtanks
Beds have a sprite to the right that has the "covers" for the bed. Fishtanks have a sprite to the right that has the "glass cover" for the fishtanks.
FurnitureFront
For furniture like couches, benches, chairs, and armchairs, the furniture needs to render partially on top of the player when the player is sitting facing left or right, and fully on top of the player when the player is facing up. The game does this by looking for a spritesheet with Front added to the end of the original spritesheet name. You can typically just copy out pieces of the furniture to make this (usually mostly empty) spritesheet.
Making the content.json
To start with, you should set up a standard Content Patcher content.json. Each of the following sections will give you specific patches to add to the Changes part of the content.json.
{
"Format": "2.0.0",
"Changes": [
// Put all the other stuff here!
]
}
Loading the Spritesheets
For every furniture spritesheet you have, you'll need to Load it into the game so that the game can use it for your furniture. If you have lots of individual spritesheets, you'll need to add a patch for each one of them. You will also need to make sure that the place you load it to here matches the furniture data's texture field, so that the game is looking in the right place.
Here's an example for a mod with one big spritesheet:
{
"Action": "Load",
"Target": "Mods/{{ModId}}/bonsai_trees",
"FromFile": "Assets/bonsai_trees.png"
},
Here's an example for a mod that has many small spritesheets:
{
"Action": "Load",
"Target": "Mods/{{ModId}}/rug",
"FromFile": "Assets/rug.png"
},
{
"Action": "Load",
"Target": "Mods/{{ModId}}/statue",
"FromFile": "Assets/statue.png"
},
{
"Action": "Load",
"Target": "Mods/{{ModId}}/arch",
"FromFile": "Assets/arch.png"
},
{
"Action": "Load",
"Target": "Mods/{{ModId}}/tree",
"FromFile": "Assets/tree.png"
},
Editing the Furniture In
To actually add the furniture data to the game, we're going to take the information you defined up above and use an EditData patch on Data/Furniture to add them to the game.
Here's an example:
{
"Action": "EditData",
"Target": "Data/Furniture",
"Entries": {
"{{ModId}}_Bonsai1": "{{ModId}}_Bonsai1/decor/1 2/1 1/1/1000/-1/[LocalizedText Strings\\Furniture:{{ModId}}_Bonsai1.Name]/0/Mods\\{{ModId}}\\bonsai_trees",
"{{ModId}}_Bonsai2": "{{ModId}}_Bonsai2/decor/1 2/1 1/1/1000/-1/[LocalizedText Strings\\Furniture:{{ModId}}_Bonsai2.Name]/1/Mods\\{{ModId}}\\bonsai_trees",
"{{ModId}}_Bonsai3": "{{ModId}}_Bonsai3/decor/1 2/1 1/1/1000/-1/[LocalizedText Strings\\Furniture:{{ModId}}_Bonsai3.Name]/2/Mods\\{{ModId}}\\bonsai_trees",
"{{ModId}}_Bonsai4": "{{ModId}}_Bonsai4/decor/1 2/1 1/1/1000/-1/[LocalizedText Strings\\Furniture:{{ModId}}_Bonsai4.Name]/3/Mods\\{{ModId}}\\bonsai_trees",
"{{ModId}}_Bonsai5": "{{ModId}}_Bonsai5/decor/1 2/1 1/1/1000/-1/[LocalizedText Strings\\Furniture:{{ModId}}_Bonsai5.Name]/4/Mods\\{{ModId}}\\bonsai_trees",
"{{ModId}}_Bonsai6": "{{ModId}}_Bonsai6/decor/1 2/1 1/1/1000/-1/[LocalizedText Strings\\Furniture:{{ModId}}_Bonsai6.Name]/5/Mods\\{{ModId}}\\bonsai_trees",
}
},
Editing the Furniture Names In With i18n
When I mentioned setting the display name above, the format I suggested has the game look in Strings/Furniture for the furniture names, so you'll need to add those in and set up i18n so that the game properly displays translated names.
Here's an example:
{
"Action": "EditData",
"Target": "Strings/Furniture",
"Entries": {
"{{ModId}}_Bonsai1.Name": "{{i18n:furniture.Bonsai1.name}}",
"{{ModId}}_Bonsai2.Name": "{{i18n:furniture.Bonsai2.name}}",
"{{ModId}}_Bonsai3.Name": "{{i18n:furniture.Bonsai3.name}}",
"{{ModId}}_Bonsai4.Name": "{{i18n:furniture.Bonsai4.name}}",
"{{ModId}}_Bonsai5.Name": "{{i18n:furniture.Bonsai5.name}}",
"{{ModId}}_Bonsai6.Name": "{{i18n:furniture.Bonsai6.name}}",
}
},
You can see that in this example, every furniture has an entry here under {{ModId}}_FURNITURENAME.Name, and that in the i18n, there's going to be a very similar entry under furniture.FURNITURENAME.name. Setting it up systematically like this helps you make sure that you don't forget any furniture, and that your translators can easily see the format of your furniture names.
You will need to make a file named default.json and put it in a folder named i18n in your mod folder. If you've done any i18n formatting before, this is just the normal thing to do.
Here's an example of what the i18n would look like in this case:
{
"furniture.Bonsai1.name": "Bonsai #1",
"furniture.Bonsai2.name": "Bonsai #2",
"furniture.Bonsai3.name": "Bonsai #3",
"furniture.Bonsai4.name": "Bonsai #4",
"furniture.Bonsai5.name": "Bonsai #5",
"furniture.Bonsai6.name": "Bonsai #6",
}
If you're including any translations into other languages, you would add more files in the i18n folder, each of them named with the language code for that language. For example, for Chinese translations, you could add zh.json, and it would look like this:
{
"furniture.Bonsai1.name": "盆景#1",
"furniture.Bonsai2.name": "盆景#2",
"furniture.Bonsai3.name": "盆景#3",
"furniture.Bonsai4.name": "盆景#4",
"furniture.Bonsai5.name": "盆景#5",
"furniture.Bonsai6.name": "盆景#6",
}
Selling the Furniture (Optional)
You don't have to sell the furniture if you add it to the furniture catalogue, but it might be nice. If so, you can reference Content_Patcher_Snippets_for_1.6#Adding_Items_to_Existing_Shops for an example.
Final Mod Structure
Putting it all together, you're going to have:
manifest.jsonsee Manifests wiki page for an example, use the content pack onecontent.jsonwith:- patch(es) to
Loadthe sprite sheets - patch to add the furniture data to
Data/Furniture - patch to add the furniture display names to
Strings/Furniture - optional patch(es) to sell the furniture
- patch(es) to
i18nfolder with:default.json- any other languages if you have translations included
assetsfolder with all your spritesheets
Using SpaceCore to Add Extra Features
For those of you who remember Dynamic Game Assets (DGA) fondly, several of the features have been added to SpaceCore by way of using Content Patcher to edit spacechase0.SpaceCore/FurnitureExtensionData under the ID of your furniture item.
Furniture Descriptions
In vanilla, all furniture has a description auto-generated by the furniture placement restrictions and type. You can add in a unique description for your furniture by adding a DescriptionOverride to the SpaceCore furniture override dictionary under your furniture ID.
Here's an example of doing this using the same Strings/Furniture format for the translations as the display name:
{
"Action": "EditData",
"Target": "spacechase0.SpaceCore/FurnitureExtensionData",
"Entries": {
"{{ModId}}_Bonsai1": {
"DescriptionOverride": "[LocalizedText Strings\\Furniture:{{ModId}}_Bonsai1.Description]"
},
"{{ModId}}_Bonsai2": {
"DescriptionOverride": "[LocalizedText Strings\\Furniture:{{ModId}}_Bonsai2.Description]"
},
"{{ModId}}_Bonsai3": {
"DescriptionOverride": "[LocalizedText Strings\\Furniture:{{ModId}}_Bonsai3.Description]"
},
"{{ModId}}_Bonsai4": {
"DescriptionOverride": "[LocalizedText Strings\\Furniture:{{ModId}}_Bonsai4.Description]"
},
"{{ModId}}_Bonsai5": {
"DescriptionOverride": "[LocalizedText Strings\\Furniture:{{ModId}}_Bonsai5.Description]"
},
"{{ModId}}_Bonsai6": {
"DescriptionOverride": "[LocalizedText Strings\\Furniture:{{ModId}}_Bonsai6.Description]"
}
}
},
{
"Action": "EditData",
"Target": "Strings/Furniture",
"Entries": {
"{{ModId}}_Bonsai1.Description": "{{i18n:furniture.Bonsai1.description}}",
"{{ModId}}_Bonsai2.Description": "{{i18n:furniture.Bonsai2.description}}",
"{{ModId}}_Bonsai3.Description": "{{i18n:furniture.Bonsai3.description}}",
"{{ModId}}_Bonsai4.Description": "{{i18n:furniture.Bonsai4.description}}",
"{{ModId}}_Bonsai5.Description": "{{i18n:furniture.Bonsai5.description}}",
"{{ModId}}_Bonsai6.Description": "{{i18n:furniture.Bonsai6.description}}"
}
},
You'd also need to add the relevant i18n entries, same as with the display names.
Tile Properties
If you want something to happen when the player walks on or interacts with your furniture, and there's a tile property for it, you can add these in using the same syntax as DGA. The wiki on Maps has a section listing all the known tile properties, but you can also use ones that mods add, such as Shop Tile Framework shops or other features.
You target the furniture ID as the key, and then put the data as a dictionary with TileProperties set to be a dictionary of coordinates to tile properties. It's a little complicated to describe, but it should be clearer if you look at the example. "1, 0" is the X, Y coordinates of the tile property to be applied (with "0, 0" being the bottom left tile of the furniture), "Back" is the layer to add the tile property to, and "TouchAction": "MagicWarp Forest 21 10" is the actual tile property.
Here's an example:
{
"Action": "EditData",
"Target": "spacechase0.SpaceCore/FurnitureExtensionData",
"Entries": {
"{{ModId}}_MagicCarpet": {
"TileProperties": {
"1, 0":
{
"Back": {
"TouchAction": "MagicWarp Forest 21 10",
},
},
"1, 1":
{
"Back": {
"TouchAction": "MagicWarp Forest 21 10",
},
},
},
},
}
}
Converting DGA Furniture
Unfortunately, because DGA was so flexible, it doesn't map cleanly to vanilla furniture. If you want to convert a DGA furniture mod, you're going to need to get your hands dirty and figure out how to map the existing data into the game's data format. Notable differences include a completely different rotations format (and limitations on how many rotations there can be), as well as a different format for spritesheet indices.
If you're interested in comparing DGA furniture to CP furniture formats side by side, both Bonsai Trees and Magic Furniture were originally DGA furniture, and you can download the old versions on Nexus to compare.

