Adding Map Patches Using Tiled
The mission: to add a few items to an existing map.
Future Infobox info: Lemurkat, May 20 2021
The tools:
- Tiled
- An unpacked TBIN file of the map you wish to edit and any tilesheets you need for the project.
- Any custom tilesheets you need to add
- Patience
STEP ONE:
Open the map that you wish to edit in Tiled.
To understand how to use Tiled, lets have a breakdown of features. The left hand side is the Properties. Important ones to note are:
- Tile Layer Format
- Custom Properties
Tile Layer Format is set to Base64 by default. Should you save your file as a TMX (recommended), you must change this to CSV or XML (the latter being deprecated). Otherwise it will not work on Mac computers.
Custom Properties define the properties of the map, in this case:
- Ambient Light: defines the light levels (rather dark)
- Music: your soundtrack when you enter it (note that this is not present in all maps)
- Warp: the tile on which you must stand to exit the map, the map it will warp you to, and the co-ordinates you will land on.
- ASDF: ASDF unknown, but present on many maps so potentially important?
Because we are making a map PATCH (ie: a small section to patch onto the map, rather than an entire map replacement) we should delete all these Custom Properties. You can remove them using the minus (-) sign. If you do not delete these, then your map's properties will override pre-existing (or other mod added properties) and may end up breaking warps or causing other issues. If removed, then it will still use the original map properties.
But I digress:
Top right hand corner, you will see a list of layers, with duplicated names. These are called Object and Layer. Object is used for adding TileData (more on that later) whereas Layer is used for adding graphics. This tutorial will focus mostly on the Layer ones (the 3x3 grid).
The layers are as follows:
- Back: the ground and everything beneath the player. These can be walked on.
- Building: Solid items, providing collision. So, walls, tables, chairs, anything that you want the player and NPCs to bang their knees on, basically.
- Front: If the character is on the tile behind this, then they will be obscured by it.
- Paths: This layer is not visible in game, but it adds things like the trees you can chop down, bushes with berries, and provides lighting.
- Always Front: Obscures everything behind it.
Below the layers is another section labelled Tilesets. You will hear the terms Tilesets and Tilesheets thrown around a lot. They are not synonymous.
Tilesheets are the PNG files.
Tilesets are these PNG files but with added code, defining features such as: can you fish in it? What noise will it make when you walk on it? Is it animated?
Now that you have a basic idea of what you are looking for, let's move on to...
STEP TWO:
Right, so this mod uses a custom tilesheet. Keep your map (the tbin file) and all tilesheets in the same folder at all times when editing your file!
To load this custom tilesheet, click the left most icon beneath the Tilesets. The one that looks like a piece of paper with a little sun on it.
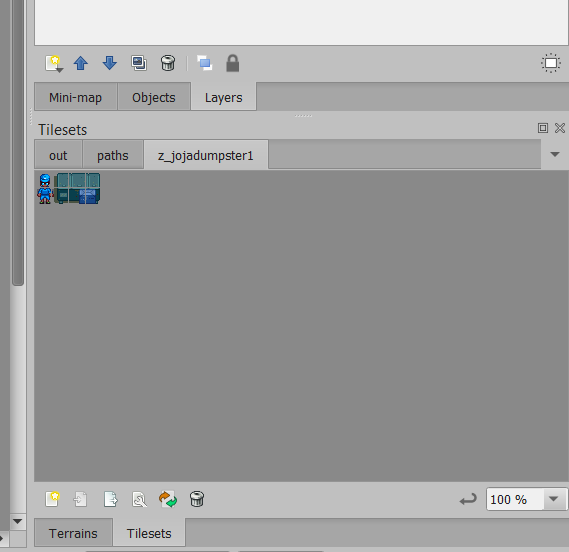
Select your file. It will automatically choose a name for your Tileset that matches the name of your PNG. You want to change this now by putting a "z" in front of it.(ie: Name: Z_jojadumpster1). THIS IS A VERY IMPORTANT STEP. There are hardcoded features that will automatically go to a certain tileset and pick a specific tile. You do not want to rearrange the order of tilesets! If you do, you can have some unexpected and unpleasant results, including mismatched tiles or Index Out of Bounds errors. Don't do it! You also want to have the "embed in map" box checked. This is what your Tilesets should now look like.
STEP THREE:
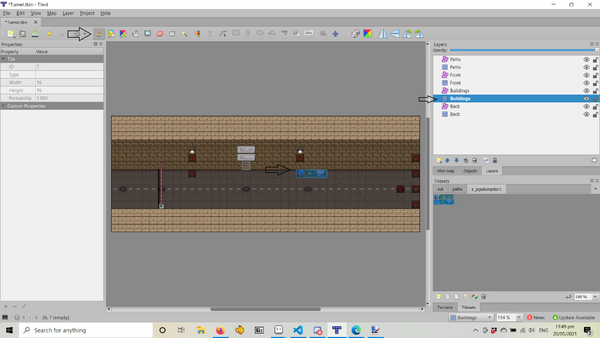
Now we have to add the dumpster to the tunnel. Since you don't want the characters to walk through the dumpster, we will be putting the lower part of it on the building layer. Select the Stamp tool (it looks like one of those old-fashioned wooden stamps) and click and highlight the lower part of the dumpster and the guy. Now, stamp this onto the map in the position you want it to be.
Repeat this process to add the upper part of the guy and the dumpster to the Front layer.
STEP FOUR:
Since we've only changed a tiny portion of the map, we don't need to replace the whole one. Before we do the next step, save your image.
You can use "Save As", (although it often is not recommended) but you must save the new image in the same folder as the original (and the tilesheets). We shall call this one: Tunnel_JojaGuy.tmx
I recommend saving the file as a TMX file, because they can be edited in a text editing program, which is extremely useful if you have accidently saved the file in a separate location and need to adjust the directory pathing. TMX also add additional features, such as the ability to rotate tiles. Note that if saving as a TMX you will need to change the Tile Layer Format to CSV or Mac players will get grumpy.
Okay, now you've saved your map, it's time to create the patch. You will want to set up your mod using Content Patcher. Whilst it is possible to do map patches via TMXL Toolkit, CP has additional features (ie conditions) and better documentation, making it very user friendly. See instructions elsewhere on how to set up your manifest etc.
Once you have set up your mod folder, transfer your map and your tilesheet/s into it using copy and paste. Open your map (if you've transferred all the files across, it should open just fine, if you haven't and get red Xs, transfer the missing tilesheets in and reopen it. DO NOT SAVE your file if it has red Xs in it. This will break your map. For the map above you will need to have three: spring_outdoors, paths, and the custom one.
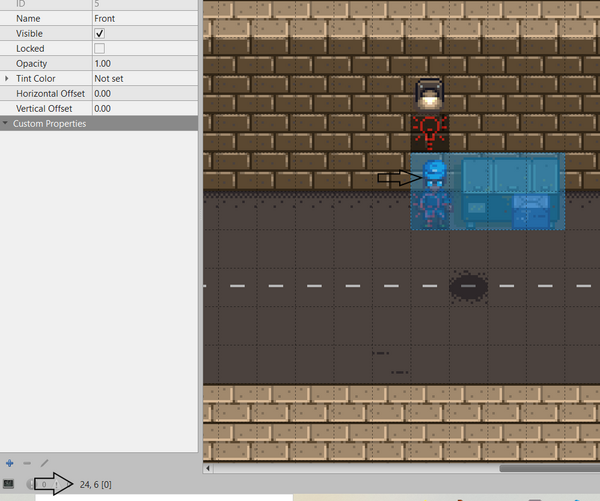
Hover on the top left hand corner of your patch. Tiled will give you the coordinates for it. In this case, 24, 6. You will also need the size: width x height, in this case, 4 x 2. Now, the code:
     {
            "Action": "EditMap",
            "Target": "Maps/Tunnel", //The Name of the Ingame Map you are editing
            "FromFile": "assets/Tunnel_JojaGuy.tmx", //the location of your tmx file
            "FromArea": {
                "X": 24,
                "Y": 6,
                "Width": 4,
                "Height": 2
            },
            "ToArea": {
                "X": 24,
                "Y": 6,
                "Width": 4,
                "Height": 2
            },

        },
And that should work! But, before uploading, there are a couple more changes you need to make:
- Make sure you have removed all the Custom Properties from your map: to avoid overriding any changes made by other mods.
- Remove any non custom tilesheets from the same folder as your map: to avoid issues with recolor/retexture mods that the player might be using.
A few more advanced things you might like to do:
- It is possible to only include a cropped version of the map in your mod. If the TMX file is only the part you want to add, you can omit the "FromArea" portion of the above code. I have included it above as it is easier to figure out the X and Y coordinates if the maps are the same.
- You might like to add versions of your map that are compatible with recolors etc. In which case, this is possible by first loading your custom tilesheet into the Maps folder. This is probably not relevant in the above example, but could be useful for larger edits.
 {
            "Action": "Load",
            "Target": "Maps/jojadumpster1",
            "FromFile": "assets/Tilesheets/jojadumpster1.png"
        },


