Tutorial: Recoloring Sprites
Recolouring game assets is one of the simplest ways to create a Stardew mod and it can be a great way to customise your game. Like the shape of a furniture item but it doesn't match your aesthetic? Want to use a vanilla asset to create something new but it's the wrong shade? Wish that one of the townspeople had blue hair? Recolouring's the answer to all of these.
Getting Ready
# Step 1
The first step is to get an image editing program that's capable of transparent backgrounds (which rules out the default Windows MS Paint program). Personally I use GIMP and will be referencing that in this tutorial, but many people use Aseprite and others that work fine are Photoshop, Paint.net, or Krita.
Have a play around with the functions so that you're familiar with where things are located, especially the Select By Colour tool, the Eyedropper, and the Fill Bucket since these three are going to be the main tools you'll use in recolouring.
# Step 2
The second step is to find the game (or mod!) asset you want to recolour. If you're recolouring a mod asset, either for personal use or to give to the original mod author, this step is as easy as downloading the mod, finding the png file you're after, and then opening it in your art program. If you're recolouring a default game asset though, this step is a little harder. Stardew Valley's assets are packed as .xnb files, so you'll need to extract them in order to modify them.
First, find wherever Stardew Valley is installed on your computer and locate the Contents folder, then look through the various subfolders until you find the asset you want. This may take a little time because some of Stardew's files have an unintuitive naming scheme or are just in weird places - for example, most of the crops and items are located in springobjects.xnb (no, there is no summer, fall, or winterobjects.xnb files) and a whole bunch of random things are located in Cursors.xnb. Once you've found it, make a copy of it somewhere else on your computer, then head over to Tutorial: Converting an XNB mod to Content Patcher which has instructions on how to extract a .png file from the xnb. Come back once you've got your .png file ready and open it up in your art program.
Starting the Recolour
# Step 3
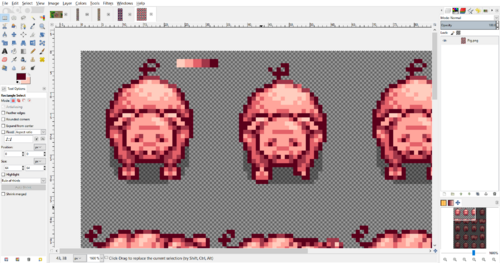
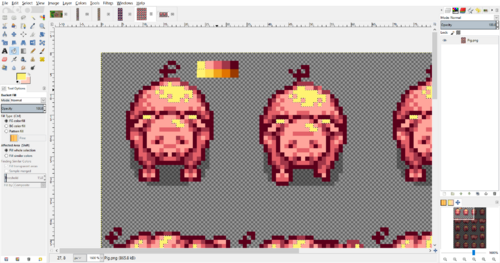
Once your asset is open, figure out how many colours there are in the section you want to recolour and make a little colour swatch by selecting each colour with the eyedropper tool and then drawing squares next to each other. As an example, I'm going to recolour the pig and make it golden - the pig is pretty straightforward since it only has 5 shades, but others might be more complicated, especially if it's something like a character portrait where one colour has been used for multiple parts of the portrait (for example, Sebastian's hair and hoodie are the same colour, and Haley's skin and hair share a shadow colour).
# Step 4
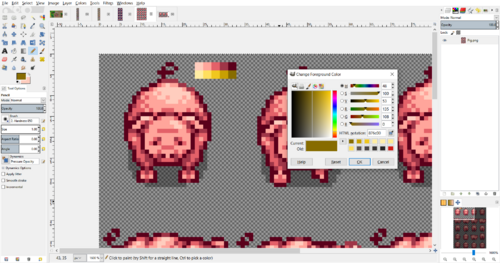
Next, it's time to select your colour palette for the recolour. An easy way to do this is to find another default asset with the colours you want (for example, for my golden pig I could use the golden pumpkin or the Stardew hero trophy) and create a colour swatch like in Step 3, but if there isn't anything you like, just open up the Change Colour box and pick something that looks nice. You'll need exactly the same number of colours as you have in your colour swatch from Step 3 so that your highlights and shadows will match.
# Step 5
At this point, if you've selected your own colour palette instead of using one from a game asset you might be looking at your swatches and saying, "these colours don't look quite right." This is probably because you've only changed the lightness value instead of also changing the hue - in simple terms, lightness affects how much black or white is in a colour while hue affects what colour it is, but for a lot of colours (particularly yellows and browns), just adding more black will make a colour look muddy and adding more white will make it look washed-out. This is why a lot of artists use a technique called hue shifting, where instead of only changing the lightness value, you also change the hue slightly at the same time, which makes your colours more vibrant and have a greater depth. When hue-shifting, generally you'll want to make your darker colours also change hue to a cooler colour and your lighter colours also change hue to a warmer colour - for example, a grass-green middle tone would look good with teal shadows and lime highlights, or a red middle tone would look good with purple shadows and pink or orange highlights.
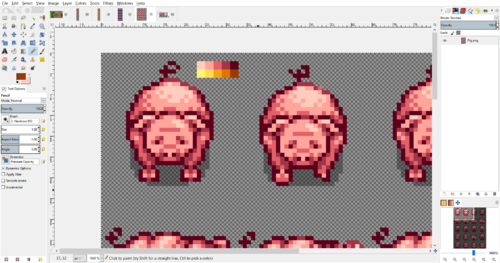
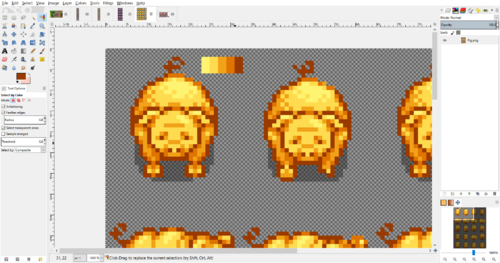
In the example picture here, I've hue-shifted my yellows to a light lemon yellow for the highlight and various gold-orange-red shades for the shadows. See how it looks more dynamic now? Selecting a good colour palette can take some practice, so don't worry if you end up tweaking your colours throughout the recolour process.
# Step 6
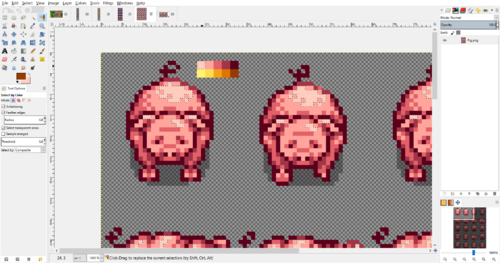
Once you're happy enough with your palette, use the select by colour tool to select the first box in your colour swatch. Check if there's any places where the colours are used in multiple places like was mentioned in Step 3 - if there isn't, then you're fine to continue, but if there is, then you'll need to manually deselect those areas from the selection using the magic wand tool (officially the "fuzzy select tool" in GIMP, apparently) on deselect mode. In most art programs, this should be as simple as picking the magic wand tool, holding down the ctrl button on your keyboard, and then clicking any areas that are currently selected when you don't want them to be.
# Step 7
When the only areas you've got selected are the areas that you want to recolour, switch to the eyedropper tool. Click on the first box in your colour palette to get it as your active colour, then switch to the fill bucket tool and click on your selected area. It should fill all of the selected area with the new colour.
# Step 8
Repeat Steps 6 and 7 until every area you want to recolour has been changed. If you want to recolour multiple sections of the same asset, then just repeat Steps 3 to 7 until you're happy with how everything looks, then erase the colour swatches from the image. Congratulations! You've successfully made a recolour! Save your work with a unique name.
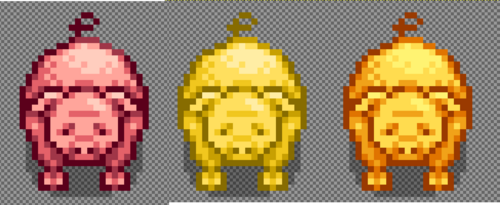
As a comparison, here's the default pig next to the original colour palette before hue-shifting and the final pig with the hue-shifted colours, to show why hue-shifting is important.
Final Step
# Step 9
Now that you've completed your recolour, you're probably wondering what's next and how you can get it working in-game. For that, you'll need to create a basic Content Patcher mod and luckily there's a great tutorial by CopperSun on how to do that. Once you've done your CP code and bugtested it (don't forget to bugtest it!), then you're done!
Thanks for reading this tutorial! Have fun recolouring things!

